How to Make Authentic Mexican Green Chili


Cook Times:
- Prep Time: 20 to 25 minutes
- Cook Time: 10 to 15 minutes
- Total Time: 30 to 45 minutes

Introduction: Rich Food, Rich Memories
As the old screen door closes behind me with a wide creak and a soft wooden slap, my grandmother, my Lita, assaults me with a barrage of sloppy wet kisses. Really? Every time?
Really. Every time.
Still, I can sense her joy bubbling over as she squeezes me tight, making it all worth it. I reach up, take her soft hand, and follow her through the old living room of the small adobe house my grandfather, my Lito, had built with his own calloused hands. Moving through their house always felt like stepping into a faded painting of somewhere warm and simple and quietly sacred. Turning the corner to the kitchen, I breathe in and remember—permeating every fiber of these memories is always the smells: the deep, rich fragrances of Lita’s cooking.
Learned by her in her youth growing up in Mexico, it is from the kitchen of this kind and loving woman that this recipe comes, down through the gift of cooking that she bestowed on my father who then bestowed it on me. Authentic Mexican Chile, made just as my Lita made it.
Other recipes by wayseeker:
Coming Soon:
- Authentic Mexican Pasta
- Authentic Mexican Tacos
- Mexican Spiced Ground Beef
- Guacamole
- Albondigas (Meatball Soup)
- Green Beans & Meat
About the Recipe:
This is a green chili recipe with an Anaheim pepper base that is different from what one traditionally thinks of as a green chili smother (often served with pork mixed in). Differences in the base ingredients, the preparation, and the addition of Longhorn Style Cheddar Cheese create a very different flavor. The recipe takes about thirty to forty-five minutes to prepare with fresh ingredients. Taking the shortcuts (mentioned below) cuts this to around twenty-five to thirty minutes.
I love to make this often because it’s fairly easy and extremely versatile. Use it for:
- Quick, Throw-It-Together Enchiladas (my personal favorite: wrap it in soft corn tortillas and smother them)
- Salsa (this chili can serve as a substitute for the wide variety of ways folks use salsa)
- A Steak Sauce (set it beside a fine steak with some guacamole)
- A Smother (on whatever Mexican-influenced dishes you might like)
- Breakfast Burritos (whip it up with fried potatoes and steak—excellent)
- An Alternative to Bell Peppers as a Chicken Fajita Base (adds a new twist)
- A Soup (put some left-over roast in and mix it up)
Be sure to look for tips along the way to give you ways to both make the process easier and customize the flavor to your individual tastes. I have also included video instructions. I recorded the entire process, demonstrating how it’s done and discussing tips along the way.

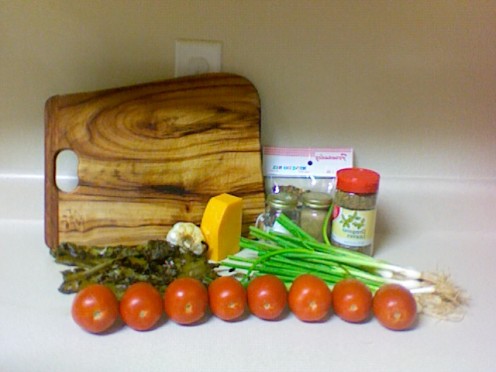
Ingredients:
Note: Measurements on all of the ingredients are very relative. Variations of a bit more of this or a bit less of that do not change the overall flavor significantly, but I encourage you to play with the amounts as you search for your own flavor preferences!
- 8 Roma Tomatoes (equivalent to a regular medium-sized tomato)
- 2 Bunches of Green Onions
- 3 Medium Cloves of Garlic
- 6 Fresh Roasted Anaheim Chili Peppers (hot, mild, or a combination to your tastes)
- 1 t. Salt
- ¼ t. Pepper
- ¼ t. Oregano
- ½ t. Menudo Mix (available in the Hispanic section of your local grocer)
- 1 1/2 c. Longhorn Style Cheddar Cheese
Tip: Using all fresh ingredients achieves the best flavor, but requires more time for cleaning the chilies and chopping the fresh vegetables. Follow the suggestions below, however, to accelerate the process without losing much in the way of flavor:
- Use jarred garlic instead of fresh
- Use canned, pre-chopped Anaheim chili peppers instead of fresh


Cooking Instructions:
1. Clean the Fresh Roasted Chilies: Fresh roasted chilies need to have the outer skin removed as well as their stems pulled off and their seeds cleaned out. Do this in a bowl of water for easy rinsing and be certain you don’t try to run what’s left through the garbage disposal—it will jam!
Tip: You can add heat by leaving some seeds in as they are very spicy, but be careful not to add too much as this can ruin it.
2. Chop the Chilies: Slice them length-wise into strips between 1/8 and ¼ inch wide and then crosscut them to create little squares of chili meat. Put them in a medium-large pot.
3. Chop the Green Onions: Rinse them well and use a large chopping knife to move through the bunches quickly. Put them in the pot.
Tip: Watch those fingers! I’ve lost the extreme tips of a few this way. (It’s okay; they grow back, but they don't do much for the flavor.)
4. Dice the Tomatoes: Use a bone-carving knife to cut the tomatoes into ¼ inch cubes, though there’s no need to get picky out it. Put them in the pot.
5. Chop the Garlic: Use a pairing knife or garlic mincer to cut the garlic into very small pieces. Put it in the pot.
6. Add Spices: Add the salt, pepper, oregano, and menudo mix to the vegetables in the pot.
7. Sauté the Mix for 10 to 20 Minutes: I like to start the oven on medium high to get things going, then reduce the heat to just above simmer. Stir occasionally.
Tip: You know the chili is cooked when the tomatoes start to break down a little and everything starts to look a bit soupy.
8. Add Cheese: Add the cheese, then immediately remove the pot from the heat element. Not doing so may result in “cheese balls” forming in your chili.
9. Grab a Spoon and Go!: All done. Time to enjoy.
Tip: You will likely find that the cheese has a tendency to stick to the plates and bowls you use to serve it, not to mention the silverware. To make cleaning easier, use a paper towel to rub off the cheese and throw it away. This leaves the dinnerware clear and ready for cleaning.
Watch me walk through each step, giving tips along the way.

Conclusion:
There’s nothing like enjoying food you have prepared yourself. If you enjoyed this recipe, please drop by my profile page periodically, as I have plans to add more recipes soon. Enjoy your meal, and thanks for dropping by!
wayseeker


